
What you need to know before you pinch and tip in your garden

Everyone wants their plants to look full, lush, and healthy. There are plenty of ways you can achieve that goal, but one method you can use is pinching, also called tipping. Not to be confused with the propagation method tip layering, tipping may sound counterintuitive and intimidating. After all, if you want your plant to grow big and strong, why would you pinch it? If you’re confused, don’t worry. We’ll explain everything you need to know about tipping and pinching, including what it is, how it works, and what plants you should and shouldn’t pinch or tip.

What does pinching and tipping mean?

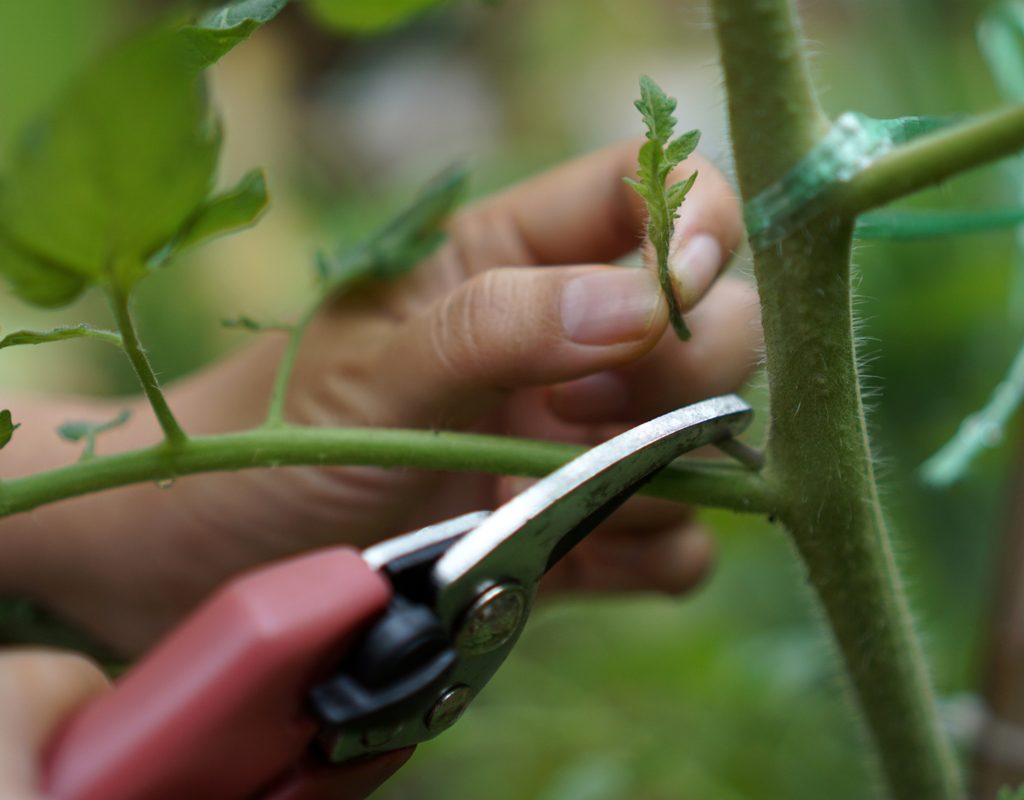
Pinching and tipping are two names for the same process. It’s a type of pruning that can be done to most small shrubs and shrub-like plants. Unlike other forms of pruning, you don’t need any loppers or special saws to pinch or tip. In fact, pinching and tipping is most often done by hand, but can also be done with scissors or small garden shears. It’s a simple process that can be done quickly and easily. The basic idea is to stimulate growth by removing the very end of a young branch or stem.

A person pruning a tomato plant
Image used with permission by copyright holder

What benefits does it provide?

Pinching and tipping works by redirecting your plant’s energy into horizontal growth, rather than vertical. This leads to vigorous new growth. However, since much of that new growth is horizontal, it can also help keep your young shrub from growing too tall too quickly. Since your plant is growing more stems, this often leads to more flowers or fruit in the long run. This is especially effective in herbs like rosemary or basil, where every new stem that grows can be harvested and used. However, since pinching and tipping forces the plant to spend more time growing, it delays flowering and harvesting by a week or more. Most gardeners find that the increased harvest outweighs the delay, but it’s still something to consider.

How do you pinch and tip?

Pinching and tipping should be done to new, young growth, so most plants benefit from it early on in the growing season. Find a young stem that has started putting out leaves but is still green. If you look closely at the base of the leaves, you should be able to see small buds or bumps right between the leaves and the stem. These buds are where the new stems form from, so it’s important not to damage them when pinching and tipping. The stem above those buds is what is pinched away. However, if too much of the stem is left in place, the plant may focus on repairing or regrowing that stem, rather than forming new ones.

So, how do you remove as much of the stem as possible without hurting the buds? The easiest way to do this is to carefully line up your cut before you make it. Use the tips of the buds as a guide, either for your fingers or for your garden shears. If your plant is significantly smaller than the tool you’re using, give yourself a little extra room, just in case. You can also make multiple cuts, starting farther away from the buds and slowly trimming off more of the stem to get closer to the buds. If you do damage the buds, you can still save your pinching attempt by moving the cut down to the next set of leaves.

A person harvesting basil with garden shears
Image used with permission by copyright holder

Which plants should you pinch and tip, and which should you not?

As we’ve already mentioned, herbs like rosemary and basil are great candidates for pinching and tipping. In fact, you can use it as your harvesting method for those herbs to increase your harvest and save time. This is especially helpful for herbs because it delays flower growth, and, for the majority of herbs, you want more leaves and fewer flowers.

More stems also means more flowers, though, when they finally do bloom. Not all flowers enjoy being pinched, but some will respond with enthusiasm. Here are some common garden flowers that you should pinch:

  • Marigolds
  • Coleus
  • Petunias
  • Impatiens

Some of the flowers that don’t benefit from pinching but may be in your garden are:

  • Sunflowers
  • Delphinium
  • Celosia
  • Larkspur

You may have noticed something these plants have in common. They all typically grow with one flower or flower spike per stem and don’t branch naturally. This is a good indicator for whether or not a plant will benefit from pinching and tipping. If the plant has naturally branching stems, it most likely will tolerate or enjoy pinching. If the plant doesn’t branch naturally, then pinching likely won’t help it.

Pinching and tipping can be a valuable pruning technique for any gardener to learn. Why not try it out for yourself and see how much of a difference it makes in your own garden? Just remember to make your cut carefully, and only pinch plants that have naturally branching stems. Plants with single stems, like sunflowers, won’t thank you for the pruning, but branching plants like basil will.

Editors' Recommendations

Cayla Leonard
Cayla Leonard is a writer from North Carolina who is passionate about plants.  She enjoys reading and writing fiction and…
What you need for a gorgeous indoor rose plant
Grow an indoor rose garden for a lively and elegant display
Several orange miniature roses in a large pot

Roses are beautiful, elegant flowers, but they’re also typically grown as outdoor blooms. They can take up a lot of space and have a reputation for being somewhat particular about their care. So what should you do if you have limited space to grow plants, or if the weather isn’t compatible with growing roses? Grow them indoors, of course! Here's everything you need to know to care for an indoor rose plant.

Can you grow roses inside?
Yes, you absolutely can! Revitalize your indoor garden with a bounty of roses. Roses will grow just as well indoors as they would outdoors, as long as you take proper care of them. Here are the basics of rose care and how they’re impacted by the change of scenery.
Light
Light is very important for roses. Most rose varieties need roughly six hours of direct sunlight a day. For indoor roses, make sure they have plenty of light or look for a variety that specifically grows in lower light. Grow lights will be crucial if your home doesn't get a lot of natural lighting.
Water
When watering your roses, make sure that the top inch of the soil is dry before you water, but don’t let the soil dry out completely. You also want to keep an eye out for the humidity. If the air isn’t humid enough, your rose may develop a spider mite infestation! You can place your rose in a tray with just a little water in it, which creates more humidity around the plant as the water evaporates. There is, of course, also the option of investing in a humidifier.
Temperature
Roses are not very fond of the cold. They need temperatures ranging from 60 to 75 degrees Fahrenheit to be comfortable. However, you can start your roses in January or February — the seeds should be just fine with this timing. The soil will keep them warm in late winter, and you should see sprouts by spring.
Pruning
Roses do need to be pruned, and this is especially true of indoor roses. Pruning keeps them healthy and from taking up too much room. Simply clip faded blooms off with sharp garden shears or a blade.

Read more
How to make sure your garden is set up to transition from summer to fall
How to get your garden ready for fall
Blooming perennial flower garden along a walkway

Taking care of a vegetable or flower garden during spring and summer is fairly straightforward, as long as you know what your plants need. The transition from spring to summer is simple, too. Preparing your garden for fall can take a bit longer, though, as you'll need to start fortifying your garden against cold weather. It can feel overwhelming if you aren't sure where to start, but don't worry! This simple guide on how to transition your garden from summer to fall will walk you through each step. You can even use it as a checklist to make sure you're fully prepared.

When should you begin transitioning your garden?
Depending on the climate zone you live in, you can begin to transition your garden from summer to fall from July to September. In general, you should start your preparations before the nights get too cold. In addition to your local weather forecasts, the plants in your yard and garden can provide valuable information about the changing seasons. Many summer fruits and vegetables are ready to harvest during the transitional stage, and you should begin seeing a few leaves changing color as well. This is a good indicator that it's time to start your preparations.

Read more
Curious when pumpkins grow? Here’s our guide to growing your own
Get your timing just right for a healthy pumpkin harvest
Medium-size pumpkin growing on a vine

Pumpkins are a fun seasonal gourd with so many uses. There are pumpkins for pies, jack-o'-lanterns, and displays. You can grow tiny pumpkins or massive pumpkins. If you’d like to start growing pumpkins in your garden but aren’t sure what to expect, then you’ve come to the right place! While there are some differences between pumpkin varieties, this general guide for pumpkin plant growth is a great place to start. Understanding when pumpkins grow and when to harvest them will ensure that you get the freshest picks for fall.

Pumpkin germination
Growing pumpkins from seed is easy and fun, but there is something to be aware of first. Different pumpkin varieties will grow at different speeds. When buying seeds, the packet should tell you how long it takes to be ready for harvest. If not, you can look up the specific variety you have. If you aren’t sure what type of pumpkin you have, though, most pumpkin varieties take between 90 and 110 days to fully mature and produce fruit.

Read more