

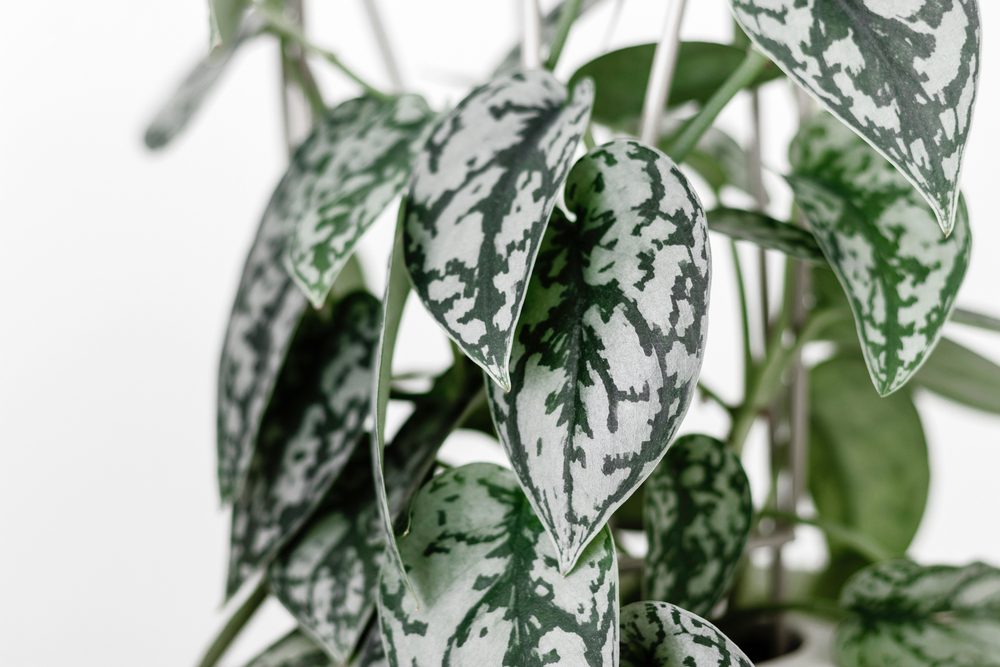
Sometimes called the "silver satin" or "satin pothos," even though it's not actually a pothos, the Scindapsus pictus is a strikingly beautiful and unique houseplant with its deep green leaves and silver spots.
These plants are prevalent among plant lovers, and it’s easy to understand why. If you’re new to the plant community or just new to these vining plants, you might wonder how to care for one properly. That's why we've put together this handy guide to get you started so you can help your Scindapsus pictus grow and thrive in your home.
The Scindapsus pictus is native to Southeast Asia and is considered one of the easiest houseplants to keep alive. This makes it perfect for beginner houseplant parents and an ideal gift to those who tend to neglect their plants.
Its dark green, heart-shaped leaves have a matte-like look to them. The most striking feature is the splashes of iridescent gray or silver, which is where the plant gets its nickname: the silver satin. It’s important to note that this plant is sometimes called a satin pothos, but this is not a pothos plant at all. It’s actually a cousin species that looks, grows, and behaves very similarly, but it's not in the pothos family per se. It's more of a distant cousin than a sibling.

How to get the plant to climb
Depending on the conditions, this plant can grow vines as long as 10 feet. It grows quickly, so you can purchase a smaller plant knowing that it will fill out rather quickly if cared for properly.
In the wild, these plants grow up the trunks of trees using their aerial roots to attach themselves to the bark. This means these plants can easily transition from hanging or draping plants to climbing a moss pole or up a trellis. Their versatile growing methods make them ideal as home decor pieces since you can arrange them or grow them in whichever way suits your space best.
Step 1: If at all possible, start the pole-training process while the plant is young, before its vines get thick and difficult to manage.
Step 2: Insert a moss pole, trellis, or other climbing apparatus into the pot. It might be easier to repot so that you don't accidentally tear or sever the plant's roots.
Step 3: Wind the vines up around the pole or trellis.
Step 4: Gently secure the vines to the trellis or pole with twist ties or string. Tighten them just until they hold in place, being sure not to nick the vines or trap any leaves.
Step 5: As the plant grows, you may need to replace the trellis or moss pole with a larger version. Repeat the process above to secure the vines to the new climbing apparatus.
Care tips for a Scindapsus pictus
Even though these plants are considered neglect-proof, it’s still good to educate yourself on what they need. This way, you’ll have a luscious and vibrant member of your plant family rather than a plant that’s simply surviving.
Step 1: Light needs: This plant loves medium to bright indirect light, but it can tolerate low light — it just won’t grow as quickly or get as big as it would in brighter conditions.
Step 2: Fertilizing needs: To keep this plant healthy and happy, feed it with balanced fertilizer approximately once a month during the spring, summer, and fall. However, don’t stress too much if you miss a month; this plant is hardy enough to survive a little neglect.
Step 3: Temperature needs: True to its reputation, the Scindapsus pictus is an easy plant to care for and doesn’t overreact to temperature changes. The average home is between 65 and 75 degrees Farhrenheit, which is perfectly fine for this vining plant.
Step 4: Humidity needs: These plants aren’t picky about their humidity and will do just fine in the average home’s humidity.

Watering your silver satin
The Scindapsus pictus likes to dry out between waterings. To ensure you’re not overwatering your plants, you might want to consider purchasing a moisture meter. These are great tools for testing the soil to see how damp it is. In addition, it prevents helicopter plant parents from over-loving their plants and killing them due to overwatering.
Step 1: Use a moisture meter or your finger to test the soil moisture. If using your finger, stick your finger into the pot as far as it can go. If the soil is dry as far as you can reach your finger, it’s time for a deep watering.
Step 2: Remove the plant from its tray, if it has one.
Step 3: Water the plant until water comes out of the drainage hole. If there is no drainage hole, water until the soil is moist but not soaking wet.
Step 4: When the plant is finished dripping, return it to its tray. Repeat approximately once a week during the growing season, or more or less often depending on your home's conditions and your plant's individual needs.
Step 5: Shower the plant every month or so to wash off the dust and debris that collects on the leaves. Alternatively, you can gently wipe its leaves with a damp cloth or paper towel.
Is the Scindapsus pictus toxic?
The Scindapsus pictus is slightly toxic and can cause minor irritation to the skin, mouth, and throat if ingested, so it’s best to keep it out of the reach of cats, dogs, and children. The symptoms are usually mild and don’t lead to anything worse than a few days of being uncomfortable, but it's still a good idea to keep it away from pets and children who might be tempted to nibble on it.
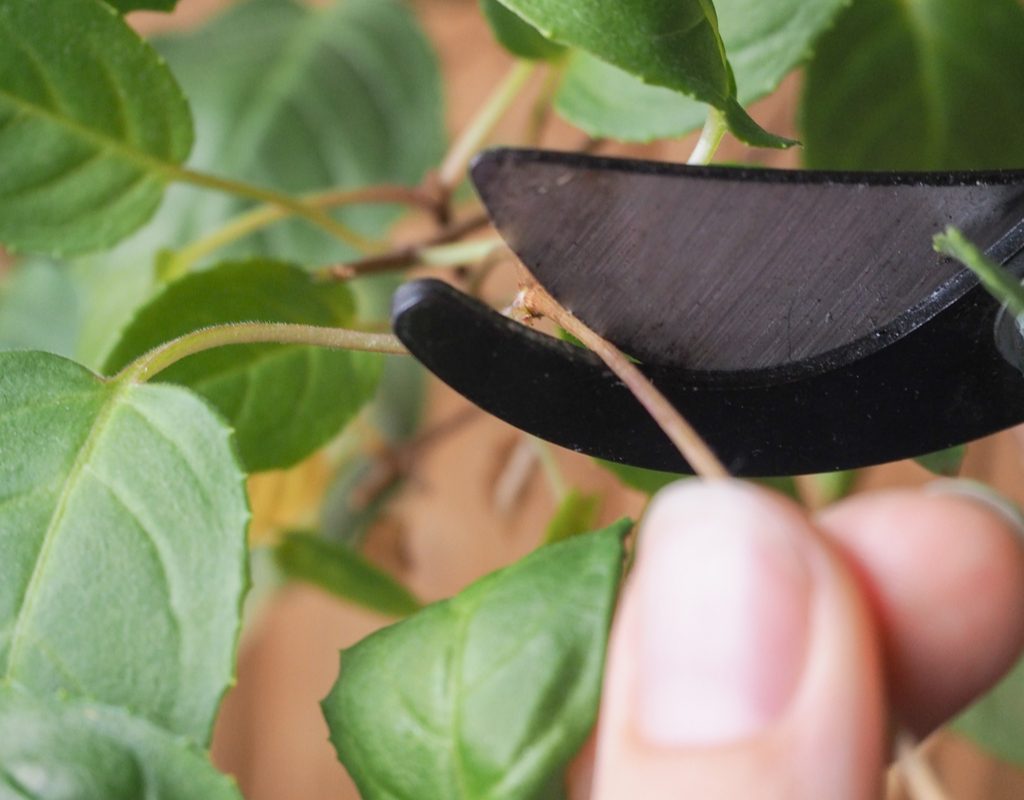
How to trim and propagate
If your Scindapsus pictus is getting a big leggy and you’re looking for a fuller-looking plant, you can easily encourage this by pruning the plant regularly and then planting the cuttings back into the pot to fill it out.
Step 1: Using sterilized pruning shears, snip off the ends of the vines as they get too long. There is no set length, just whatever you prefer. Pruning this way will enable the plant to grow bushier rather than longer.
Step 2: If desired, place the snipped ends into a small glass container of water and set them in an area with similar light to the mother plant.
Step 3: Once the cuttings' roots are about two inches long, you can transplant them into the pot with the mother plant, giving your plant a bushier appearance.
Although rare plants are beautiful and fun to collect, there’s something so beautiful about the simplicity of a Scindapsus pictus. While you might see it everywhere, it’s still a stunning plant that can add a dramatic waterfall of green down your wall or give your room a jungle feel as you train the vines to climb. Use these care tips to encourage your silver satin to grow and live its best life.


