
Gardening 101: How to choose the best greenhouse grow lights

If you want your plants to truly flourish, it’s going to take special care, which means ensuring accurate brightness and suitable temperatures inside your greenhouse. Your efforts must be geared to help the entire process of photosynthesis, which in many cases isn’t maximized by the natural lighting your greenhouse receives from the sun.

By choosing the right greenhouse grow lights you can supplement natural lighting in just the way your plants need. Plus, if you know what you’re doing with grow lights, you can live anywhere in the world and enjoy a planting process that works all year.

As we discuss all that goes into choosing greenhouse lights, be sure to think in terms of minimizing costs and maximizing your return on investment (ROI).

Vegetables Grown Under LED Lights
asharkyu / Shutterstock

 Understanding greenhouse lighting requirements

There’s so much more to proper greenhouse lighting than you might think. However, while there’s a lot to consider, there are three major factors you need to keep in mind:

  • How much sunlight you have available
  • What time of year it is
  • What kind of crops you are attempting to grow

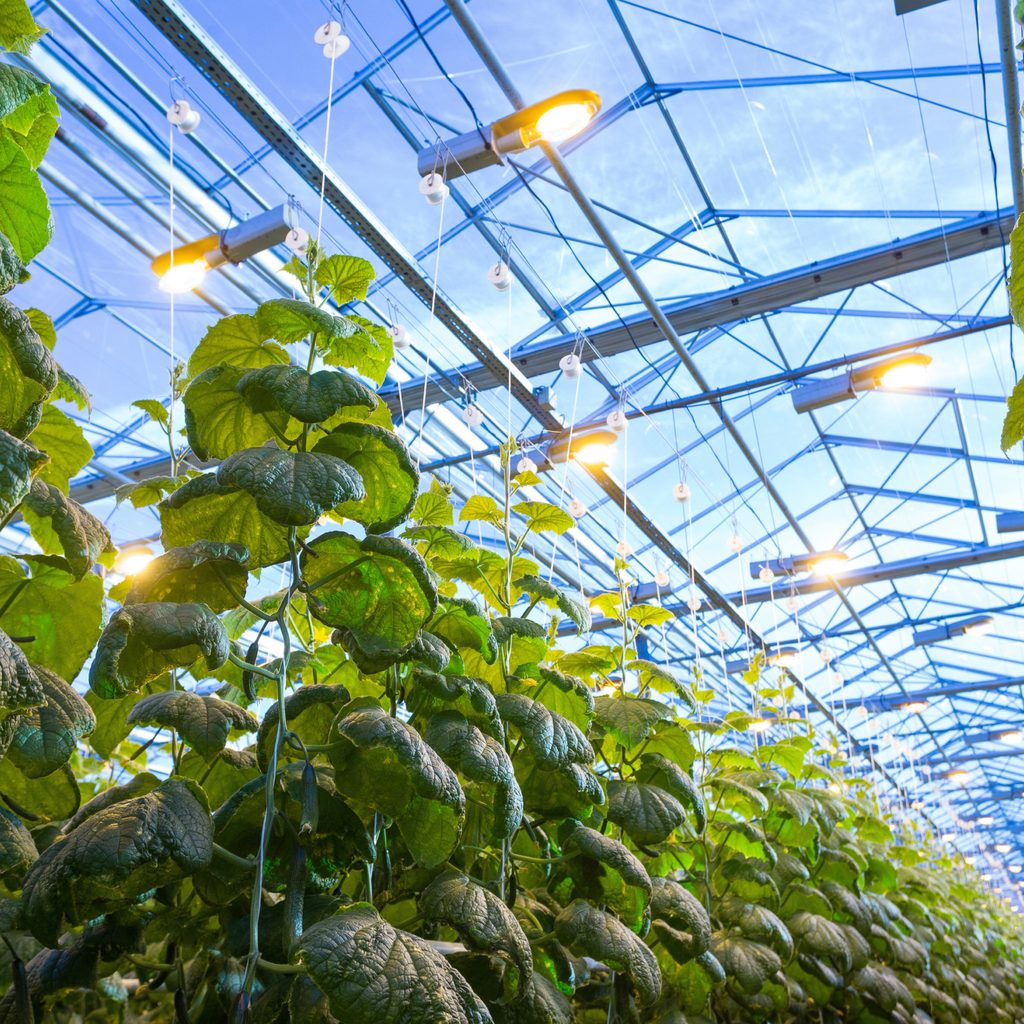
In general, greenhouses need at least six hours of full-spectrum light or direct sunlight per day. You’ll need to integrate supplemental, artificial lighting if this can’t be done naturally. Of course, supplemental lighting uses sets of artificial grow lights to encourage healthy crop growth.

If you’re not a commercial grower, then it’s likely you’d use grow lights to extend the overall growing season, whereas if you’re running a commercial greenhouse, you’ll be looking to enhance your harvest and net profits.

With that said, whether you’re a hobbyist or you’re running a business, you’ve got a variety of lighting options from which to pick and choose.

Consider these different kinds

As noted earlier, there are a number of different grow lights you may wish to use in your greenhouse. Each has its pros and cons.

Incandescent grow lights

For instance, incandescent lights are super cheap, but they also only last for around 1,000 hours or so. Other grow light options simply blow incandescent bulbs away when it comes to longevity. Additionally, while they might be the option with the lowest upfront cost, the cost to operate them all but negates the initial benefit of being inexpensive to purchase.

In terms of using incandescent bulbs, you’ll need to be a bit cautious since these lights can become quite hot and could damage your plants.

Fluorescent bulbs

These kinds of lights are more energy efficient than incandescent bulbs and can last at least 9,000 hours longer! The downside is that they are also much more expensive.

HID lights

Immensely popular, these lights outlast both of those listed above. Able to work for up to 24,000 hours, these too are more energy efficient than incandescent lights. However, HID lights aren’t suitable for all types of greenhouses since they require large fixtures and generate an incredible amount of heat.

LED lights

LED (light-emitting diodes) are more popular than ever these days. Benefits include the fact that they’re one of the most energy-efficient, environmentally friendly options available and they last a long time, too. Still, just as the downside to incandescent bulbs negates their low, up-front cost, the same is true of LED lights only in reverse. LED lights are the most expensive option on the market today.

Cucumber Plants Growing
Photo By pipicato/Shutterstock

Choose the grow lights that are right for your needs

One of the most crucial (and expensive) choices you have to make when it comes to controlling your greenhouse environment is solving the lighting issue. Whether you decide upon a traditional grow light or lights based on newer technology, you need to choose what’s right for your budget and your greenhouse’s actual needs.

Select the right light

Keep in mind that the right greenhouse lights can help temper your overall operating costs, optimize output, and help you to keep up with a rapidly changing market.

To select the right kind of lights for you, do the following:

  • Decide what your operation’s goals are
  • Decide what your target lighting requirements are
  • Determine the total area of space you’ll need to cover
  • Compare and contrast how each lighting option impacts the above
  • Estimate your total initial purchase cost (the obvious cost)
  • Calculate your ROI and how long it’ll take to recoup your costs
  • Make your purchase

If you want crops that grow year-round, having a greenhouse with proper lighting is essential regardless of exterior conditions. There’s a lot to think about when it comes to putting together the best greenhouse for your plants, but with the information we’ve provided, we’re confident you’ll make the right choice every time.

Editors' Recommendations

Will Blesch
Former Digital Trends Contributor
Will Blesch is a copywriter, content writer, and someone passionate about anything that lets him discover more about this…
A complete guide to cleaning your greenhouse for beginners
greenhouse

When you first installed your greenhouse, it probably looked like a glittery glass castle for your lovely plants to grow and live in. However, weather, soil spills, and birds have made their mark on your greenhouse over time and now it's probably looking cloudy and nasty. So how do you clean a greenhouse?
Why worry about a clean greenhouse?
You may be wondering if you even need to worry about cleaning your greenhouse. If you don't mind the dirty look, maybe you could leave it as it is? Unfortunately, it's much better for your greenhouse and your plants if you give the greenhouse a deep clean at least once a year. It'll make it easier to use when it is clean and organized, and the walls of the greenhouse need to be clear so they can let in as much light as possible. Additionally, a clean greenhouse is less likely to spread pests and diseases to your precious plants. And lastly, things last longer when you care for them and greenhouses aren't cheap.

When should you clean a greenhouse?
There's no right time to clean a greenhouse; whenever you can is better than not at all. However, we suggest cleaning it when there isn't so much to do in the garden and it isn't so hot out. Usually, the fall is when the garden chores slow down and it starts to cool out, making cleaning the greenhouse much easier on you.
What is the best way to clean a greenhouse?
You can use whatever cleaning method works for you, but here is our step-by-step process that we recommend.
Step one: Empty the space
Of course, we know you can only empty a greenhouse so much if you have tender plants that need to stay warm. But as much as you can, take out the tools, buckets, and bags of soil. It will be much easier on you if you don't have to fuss with items in your way as you clean the walls and floors. This also allows you to go through what you have and declutter if necessary.
Step two: Rough dusting
Over the season, spiders and bugs and maybe even some mice have tried to make homes in your greenhouse. This has probably led to a few cobwebs and dust piles around the corners. You'll want to remove these large areas of debris before you start the deep cleaning. Use a broom to knock down the cobwebs and sweep up the floor; you've probably spilled some soil during the summer!
Step three: Clean the walls
The panels of your greenhouse will now need to be deep cleaned. You can use a bucket of warm water and a sponge to wipe them down, but we also recommend bringing a long-handled brush to make life easier. This way, you can dip the brush into the bucket of soapy water and scrub down the walls with the long-handled brush. You'll be able to reach every inch of the walls without killing your back.

Read more
When and how to transplant tomato plants for the best results
baby tomato plants

There's a time in every gardener's life when they try to grow their own veggie plants from seed. This is a gratifying process, and there are many benefits to growing your own seed starts. One of those benefits is bigger and healthier plants. By growing your own baby tomato plants, you can ensure that the plants are well cared for, never given anything you don't want them to have, and transplanted in just the right way at just the right time for optimal plant health. So how do you transplant tomato plants to ensure they're happy and healthy and live to produce lots of yummy tomatoes for your home?

How do you transplant a grown tomato plant?
If you've never transplanted tomatoes before, the idea can be intimidating. You have all these tiny plants that you've cared for over the last several weeks, and now it's time to pluck them out of their nursery pots and plop them into the outside soil where they're exposed to sun, weather, and critters. Luckily, you've cared for them so well that they're healthy and robust plants that will be able to handle anything nature throws at them.
Step one: Harden the plants
Hardening the plants is a term gardeners use when talking about the process of acclimating a greenhouse-grown plant to outside conditions. Typically it refers to sunlight, but it could also refer to wind and other weather that could harm the plant. About a week before you're ready to transplant, you'll want to harden your baby tomato plants by exposing them to sunlight at increasing increments each day. For example, day one should be about 30 minutes, then 45, then 50, and so on until the day of transplanting. If you don't do this, you'll risk your plant being burnt and killed when you transplant it outside.
Step two: Don't water the plants
Before you start pulling little plants out of their pots, you mustn't water the plants a few days before transplanting. Wet soil can make the transplanting process much harder on you and the plant. Dry soil falls away easier and is less likely to break off roots as you move the plants to their new home.
Step three: Prepare the new soil
The new location for your tomato plants will need to be prepped before you get all those babies out of their homes. Whether you are planting into the ground, a raised bed, or a pot, you'll want to amend the soil to guarantee that the plant has many nutrients to soak up. It also is easier if you dampen the soil right before transplanting. Damp soil is much more manageable and more easily manipulated around the plant.
Step four: Plant deeply
As you gently pull out the baby tomato plants, you'll want to shake off the old soil to expose the roots. This will ensure the plant has access to the new soil and nutrients you're about to provide it with. 

Read more
A complete guide to the best lights to choose for your greenhouse
Houseplants under grow lights

Just like growing houseplants indoors, growing plants in a greenhouse requires specific care and a suitable environment. Even though the greenhouse will have some light from the sun coming in, the glass panes are often filtered in some kind of way to prevent your plant’s leaves from scorching. Enter grow lights. They’re used most commonly in darker spaces or during colder months; however, they're greatly beneficial to your greenhouse plants and help ensure that the plants are getting the light they need to thrive.

Can you have an indoor greenhouse?
Absolutely! Indoor greenhouses are revered for how sustainable and inexpensive they can be. An indoor greenhouse with lights can be installed anywhere in the home where you have the space, and it’s a perfect place to grow things like fruits, herbs, and veggies indoors. If you’re only planning to grow a couple herbs, you can get something as small as a tabletop greenhouse! It will fit a few plants, won’t take up too much space, and will add to the aesthetic of a room while letting you grow plants in a unique way.

Read more