Fresh strawberries are sweet and delicious, and they’re not too difficult to grow. If you just want a few strawberries every so often, then a single, potted strawberry plant may be enough. If you want more, though, maybe for jams or jellies, then a strawberry tower is just what you need! It maximizes the amount of strawberry plants while minimizing the amount of space needed. You can buy a strawberry tower, sure, but you can also build your own. Here’s what you need in order to make your very own strawberry tower!
What is a strawberry tower?
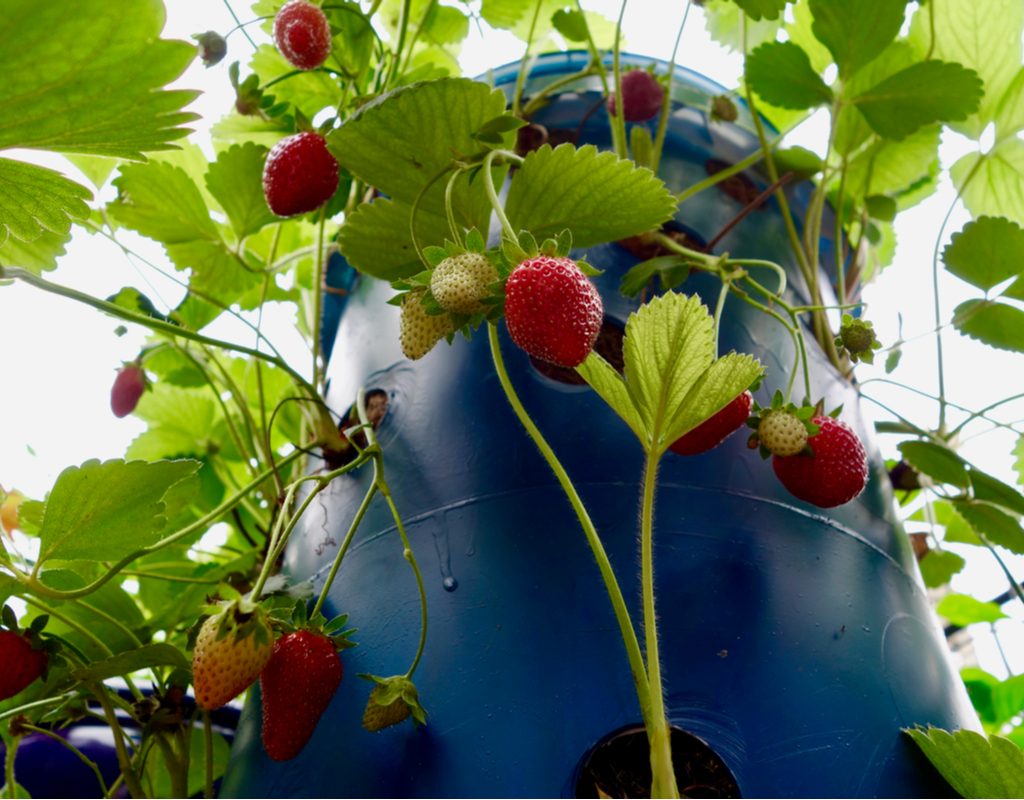
A strawberry tower is, as the name suggests, a tower on which strawberry plants are grown. The strawberry plants are stacked, which increases visual appeal and the amount of plants you can have in a limited space. A strawberry tower can be a series of stacked or nested individual planters, but the more space-efficient tower is a single column with multiple strawberry plants growing from the sides and tops. This makes it excellent for any area, whether you’re putting your tower outside or squeezing it into one corner of your apartment.
Strawberry towers are very easy to make, and there are a couple different ways you can go about constructing one. They can be as complicated and artistic as you want, and you can make them out of almost any material you have on hand. We’re going to be covering the most basic DIY version of a strawberry tower, but feel free to put your own spin on it!
Basic tools
To make your strawberry tower, you’ll need a few basic hand tools. You’ll need a drill with a drill bit that is two inches across or a similar size. This creates the holes in the side that the plants grow out of, so you need it to be big enough for your plants, but the size can vary.
You also need a hacksaw or similar blade. The exact blade can vary depending on your skill level and the material you choose for your base. It’s used to cut the bottoms off of the bucket(s) used to form the tower.
If the bucket(s) you use for your base have handles, you’ll need pliers to remove them. You’ll also need a smaller blade, such as a pocket knife or scissors, to cut through the lining in the same place that you’ve drilled your holes. A marker or pen is also useful to draw where you want your holes before you drill.
Remember to be careful when drilling and sawing! Having eye and mouth protection is a great way to protect yourself from any flying pieces of plastic.
Bucket or buckets
To form the main column of the tower you’ll need buckets. The exact number and size depends on how tall you want your tower to be. You can use any bucket, but all your buckets should be the same size, or, at the very least, the same width. This is so they stack properly. BPA-free plastic is typically preferred, but the material is up to you.
Cut the bottom off the bucket that will form the base so that excess water can drain from your tower. If you’re planning on having this tower indoors, you may need an additional tray for your tower to sit in, so that the water can drain without damaging your floors. For any additional buckets, cut the bottom plus an additional inch to inch and a half. This should make them stack. Once they’re stacked, you can drill the holes in, and then paint or decorate if you’d like.
Liner
To keep the soil from spilling out of the holes, you’ll need something to line the inside of the tower. While any material can be used, keep in mind that this will be in constant contact with the soil and plants. It needs to be something that won’t break down and harm your plants. Look for garden cloth or burlap. You can secure it to the top of your tower with anything you’d like, from clothes pins to glue. Once your tower is lined, cut out the holes where the plants will grow through. Now you’re ready to fill it with soil and plant your strawberries!
There you have it, the basic version of a strawberry tower! This simple but marvelous way to grow a lot of fruit in a little space can be yours with just a few hours of work, some basic tools, two main items, and, of course, some soil and strawberry plants. Remember to be safe when using any tools, measure twice and cut once, and let your creative spirit take the reins! Your strawberry tower can take on so many different forms and appearances now that you know the standard base. So enjoy your fresh strawberries and the satisfaction that comes from making something with your own hands.