Being a succulent, the aloe vera plant is one of the easiest plants for forgetful plant parents, traveling gardeners, and beginners alike (even during the winter!). It’s drought tolerant and can easily survive a few missed waterings; however, the more stress you put the plant through, the more likely you are to see problems start to rise. Stress leaves your plant vulnerable to pests, diseases, and fungal infections, which only stress your plant out more! Not to worry, though, many of the problems your aloe plant may be facing are easy to identify and treat. This guide to treating a sick aloe plant will explain everything you need to know.
Can plants get sick?

Yes! Just like people or pets, plants can get sickness and disease — and that includes aloe vera. Your plant will have different symptoms depending on the problem, similar to how a common cold exhibits differently from the flu. And even more complicated is the fact that individual plants are always susceptible to the same things. It’s important to familiarize yourself with the variety of plant you’re growing (in this case, aloe vera) and their weaknesses so that you know what to look for.
How to tell if you have an unhealthy aloe plant
When it comes to an unhealthy aloe plant, there are a few different things you can look out for. Sometimes, the cause is as simple as underwatering or overwatering your plant; other times, you’ll have a disease or fungus on your hands.
Brown or black circular spots on leaves
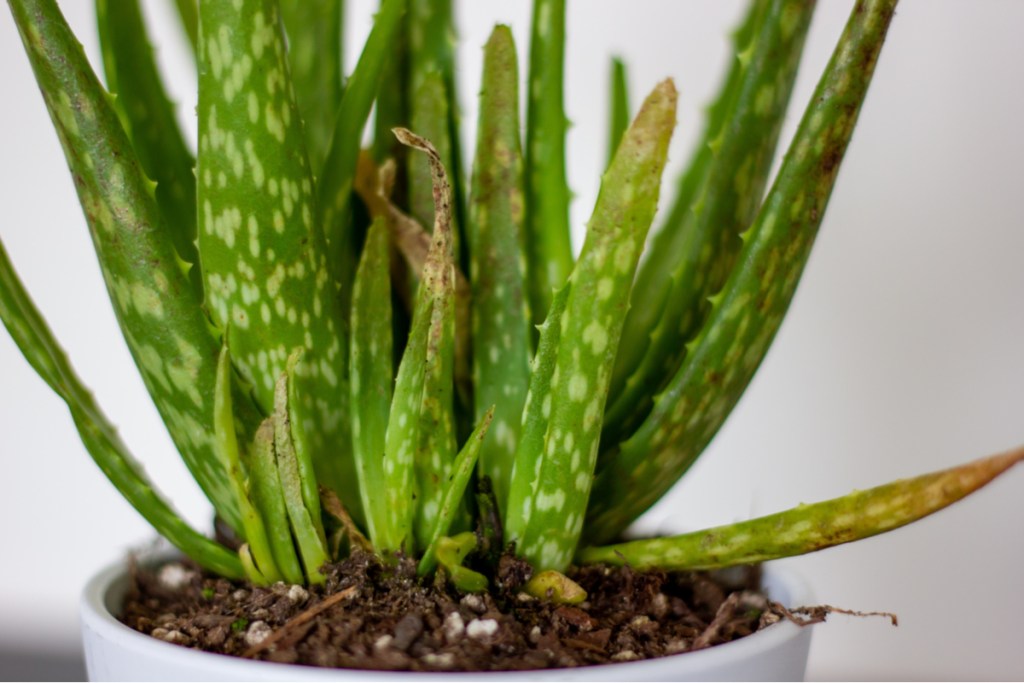
Brown or black spots that form on the leaves of the aloe plant are symptoms of a fungal disease called aloe rust. These darkened areas oxidize and seal off from the rest of the plant, so you won’t see a large spread of discoloration. This fungal infection is attracted to aloe plants that don’t have adequate sunlight or those that have leaves with stagnant water on them.
Unfortunately for aloe rust, prevention is the way to go. Be sure to thoroughly inspect an aloe plant before buying. If one at your home starts to exhibit signs, you’ll want to remove the diseased leaves with a sterilized pair of shears, repot in fresh soil, and make sure to provide proper care.
Mushy, dark lower leaves
Root rot, which is caused by overwatering, often displays physically through the lower leaves of your aloe plant, turning dark and mushy. If you notice the bottom of your plant starting to rot, chances are you’re giving it too much water.
To fix this problem, you’ll need to first remove your aloe from its pot, discard the old soil, and gently rinse off the roots. Examine the root system for any brown, mushy parts and remove them with sterilized scissors or shears. If there are any white roots left, repot your aloe in a clean pot with fresh soil; if there are no white roots left, it’s, unfortunately, time to discard the plant.
Mushy, collapsing leaves
Soft rot also causes mushy leaves, but not just near the lower part of the plant. If your aloe is suffering from soft rot, you’ll notice water-logged spots on the leaves of your aloe plant that slowly turn mushy and collapse.
Soft rot is largely caused by water that collects and sits in the crown of the plant. If you have a plant with soft rot, there’s not much you can do to try saving it. Depending on how far along it is, you may be able to take a sterilized pair of shears, cut above a growth node on the stem, and pot the cut end in fresh soil to grow new roots; however, if any part of the upper portion of your aloe has soft rot, it won’t be viable.
Tip dieback
Tip dieback is another indicator that you have poor-draining soil and an overwatered plant. Usually, this will start to happen before root rot takes hold, so if you notice the tips becoming water-logged, turning brown, and shriveling, you should repot the plant in fresh soil and change your watering habits before it’s too late.
Leggy appearance
There’s so much out there about root rot, but an overlooked indicator of a struggling plant is leggy foliage. If your aloe vera leaves look extra long and skinny instead of wide and plump, it might not be getting enough light — this causes your plant to reach for light. Moreover, you might be giving your plant more fertilizer and water than it can handle.
Legginess is simply your plant’s response to the lack of optimal conditions. A spindly appearance doesn’t necessarily mean that your aloe is dying, but long-term deprivation of a proper care routine can cause big problems down the line. You can cut down the skinny leaves and place your plant in a brighter area.
What you can do to prevent future sickness

The best way to prevent future problems and diseases, for any plant, is to keep it as happy and healthy as possible. Following the proper care requirements for a plant ensures that it’s in a stable, preferred environment while being able to grow strong.
For aloe plants, this means:
- Regular watering
- Bright, indirect light
- Well-draining soil
If you’re worried about watering too much, it’s always best to wait a few more days (or even weeks) and then water, since aloe vera is relatively drought tolerant. With good, diligent care, you’ll have a thriving aloe plant for years to come.
Can you harvest from a sick aloe plant?

Aloe gel is great for treating sunburns and making skin creams, and harvesting it from your own plant is simple. If you’re dealing with a sick aloe plant, you might be wondering if harvesting and using the gel is safe for you and your plant. While the gel likely won’t cause you any problems, depending on what your aloe plant is struggling with the gel may not be a pleasant texture.
More importantly, cutting leaves off your aloe plant causes stress. A healthy aloe plant can recover from this stress quickly and without issue. However, a sick aloe plant will struggle to recover, since it is already weaker than normal and trying to recover from its other problems. You should avoid harvesting from a sick aloe plant for this reason.